3 min reading time
Record your Zoom Meetings to Create eLearning Videos

We all know that using video-based course content is a great way to train your learners. But how can you create it from scratch? Here at LearnUpon, we record lots of team meetings, product sessions, and presentations that we share with the wider company via our training portal. It’s a great way to reformat your video content and make it easier to share knowledge across teams without the need to attend the live sessions.
This approach has helped us build up informative training content for new team members. How do we do it? We use Zoom, a great web conferencing tool, to facilitate and record these meetings.
How to record a Zoom meeting
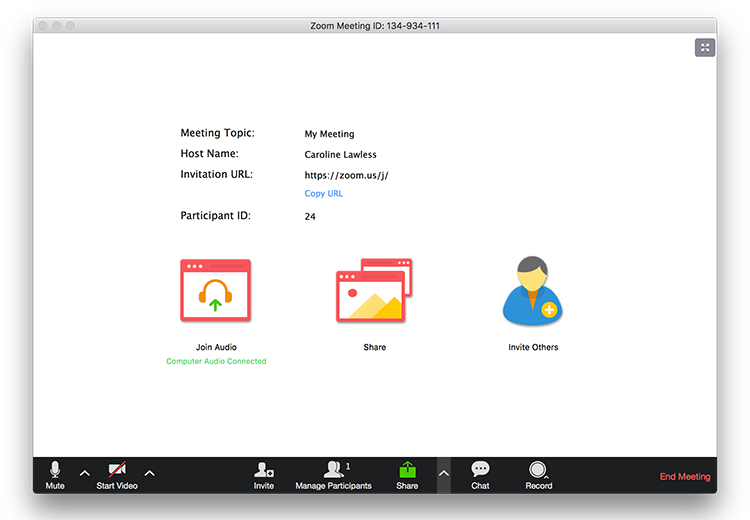 To start a recording in Zoom follow these simple steps:
- Start the meeting as the host
- Click the Record button
 Choose to ‘Record on this Computer’ or ‘Record to the Cloud’. Recording to your computer saves the recorded videos to the hard drive of the device you are currently using. Recording to the Cloud allows you to host your training video in the ‘My Recordings’ section of your Zoom account. Saving to the cloud is the better option to choose if multiple people are involved in the process, as it gives everyone access to the recordings.
 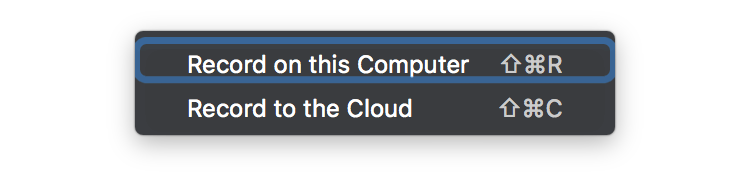 When you start recording a ‘recording’ message is displayed on-screen to you and the other attendees. You can stop or pause the recording at any time. You should note, however, that stopping the recording will split the video, producing multiple files. So if you want to keep things simple and have a single recording of a meeting, just hit pause.
To end a recording, click on the stop button above the ‘Pause/Stop Recording’ text or simply click the red ‘End Meeting’ button at the bottom of the screen. After the meeting has ended the video will be converted and stored in the destination you chose.  Alternatively, you can set your meeting to automatically record when you set up the session in your Zoom account.
- Navigate to your Account settings and click on ‘Recording’
- Make sure the box for automatic recording is ticked
- Choose where the recordings will be placed
What is recorded?
To choose which screens are being shared and more importantly, being recorded click on the ‘Share’ option. In the dialog box that appears you will see all of the applications and screens that you have open. You can choose from there which one you want to share on screen for recording.
These need to be set up by clicking the upwards arrow to the right-hand side of the start/stop video option. From there you can click on Recording and select the option “Record video during screen sharing” and/or “Place video next to the shared screen in the recording”. Your sharing options include:
- Record the presenter(s)
- Record a presentation as the presenter(s) speak over it. A presentation can be a PowerPoint or a screen capture of the presenter using an application.
- Record a presentation or screen capture with a small thumbnail image of the presenter in one of the corners.
There are lots of other possibilities available to you, but these three are a great place to start.
Where is the recording?
As mentioned previously, cloud recordings are found in your Zoom account in the ‘My Recordings’ section. They take a little time to process so you may have to wait a few minutes for them to become available. If you chose the local, record to computer option your video will appear in the default location
- PC: C:UsersUser NameDocumentsZoom
- Mac: /Users/User Name/Documents/Zoom
During the actual download process, you can choose another location such as your desktop.
Where to use your videos
Now that you’ve captured a recording of your latest Zoom meeting how will you use it? We suggest you edit out any excess footage at the start and the end of the recording. The video should start straight into the presentation or meeting itself. Here at LearnUpon, we record two different types of meetings, for two very different audiences – our colleagues and our customers. Recordings of internal presentations and meetings are uploaded to our LMS.
These become eLearning courses for new hire onboarding or for enabling team members to keep up to date on our latest features and releases. For example, our product team created a recording explaining how a LearnUpon admin can integrate their LMS with Zoom. This session took place just before we released our Zoom webinar integration and got everyone up to speed on exactly how it works. And then there are videos recorded for the public. We run and record webinars on various topics and the recordings now live on our YouTube and Vimeo accounts.
Conclusion
Recording live sessions is an easy way to create really engaging and informative training content. And tools like Zoom make it easy to record these sessions for resharing. Take time to identify the meeting and webinar sessions that are already happening in your organization that could be repurposed into training content by simply hitting record.