8 min reading time
Video Editing Basics for eLearning

Using video is a great way to keep your learners engaged. It provides them with a rich medium for sharing information in an easily digestible format. That said, people’s time is precious, so your videos need to be concise. And you don’t want to have to spend hours choosing the perfect blend of footage. That’s why editing is so important for eLearning. You need to be pragmatic to ensure that your final cut is comprehensive. In this post, I’ll introduce you to some basic video editing principles that you can quickly apply to your own training videos. This includes:
- Planning
- Software options
- Basic editing techniques
- Transitions
- Adding detail
- Export
Planning your video
We regularly speak about the importance of proper planning for eLearning programs. This is especially true for video-based course content. Good planning sets out the learning objective each video is going to fulfill, and how it’s going to achieve it.
What is the purpose of the video?
Ask yourself “Where does this video fit into the course? Is this video for the entire course or simply an element or module?”. The answers to these will influence the length, style and content covered. Run a whiteboard session to plan out the purpose of the video and once you’ve worked through these questions you’ll come out with a basic plan. At this stage, you may decide that video isn’t the right medium for your subject matter. A step by step document may be easier for the learner to follow to meet the learning objective. And ultimately, that’s what you should be aiming for. The optimization of your training content by choosing the format or meeting that best meets your learners’ needs.
Planning steps to follow
When planning your video you can follow these simple steps:
- Storyboard: A storyboard is a way to map out and structure your video content in a comic strip style. It helps you to visualize the basic steps or scenes of the video without putting in too much effort. For more information check out our simple guide to storyboarding.

- Write a script: Depending on the style and content of your video you may want to take some time to write a script. Even if you don’t stick 100% to it, it will gather your thoughts so that you are coherent and succinct with your points. And you’ll save time when it comes to filming. This helps to keep your audience engaged. It’s very difficult to edit out rambling! A great video is like a well-planned bank robbery – get in, get the most amount of value, and get out. Each video should start off with a statement of intent followed by a reason why it’s beneficial for your learner to watch it: “This short video explains the new fire safety procedures so you’ll be prepared in case of an emergency”.
- Collect content/media: The biggest stumbling block with editing is not having enough raw materials to work with. Make sure you have enough images, video, and audio so that you don’t have to create extra later. An important step here is to collect some B-Roll. This is footage that can be used to add variation. From a pragmatic point of view, B-Roll makes life easier during the editing stage!
- Rough cut: Always create a basic rough cut first. It will highlight any unforeseen issues. A rough cut is where you put all of your media in place without spending too much time fine-tuning it. It gets you close to where you need to be while giving you an indication of what you need to change.
- Fine edit: This is the final stage of the editing process. You’ll spend time making sure that all of your footage and B-Roll fits together perfectly while ensuring there are no sections that are jarring for the viewer. It’s a good idea to share this cut with two or three of your colleagues to get their feedback in case there’s anything you’ve missed or overlooked in the editing process.
- Music, lower thirds and other details: These can wait until the very end when you’re 100% happy with your final cut. They add a nice level of professionalism and can be used over and over in other projects.
Editing software options
There are quite a few video editing software options on the market. And the right one for you depends on the depth of your requirements and your budget. If you need to simply trim some fat from a video you can easily get away with using ‘free’ tools, like Quicktime or Movie Maker. If you need a little bit more functionality some good options are:
Most video editing software use similar symbols for each action. This makes it relatively easy to pick up one if you’re familiar with another. For example, if you want to cut a piece of footage look for the scissors or razor symbols! Editing used to involve the physical cutting and overlaying of cellulose tape. Those days are gone, but software design often takes visual cues from the past to make it easier to understand the functionality at hand. This is called skeuomorphism. Naturally, the learning curve can get a little steeper in more complicated workflows, but at least there are some similar tropes that apply to each tool. That’s the reason why we can keep this largely agnostic to editing tools. Let’s cover some basic actions that will help you cut your video content down to size.
Basic editing techniques
Here at LearnUpon, we mostly use Adobe Premiere Pro, but these steps are pretty universal and can be applied to the software of your choice. We also use Camtasia, predominantly for screen capture. Here are the steps to follow to edit your video:
- Upload your media (video, images, and audio).
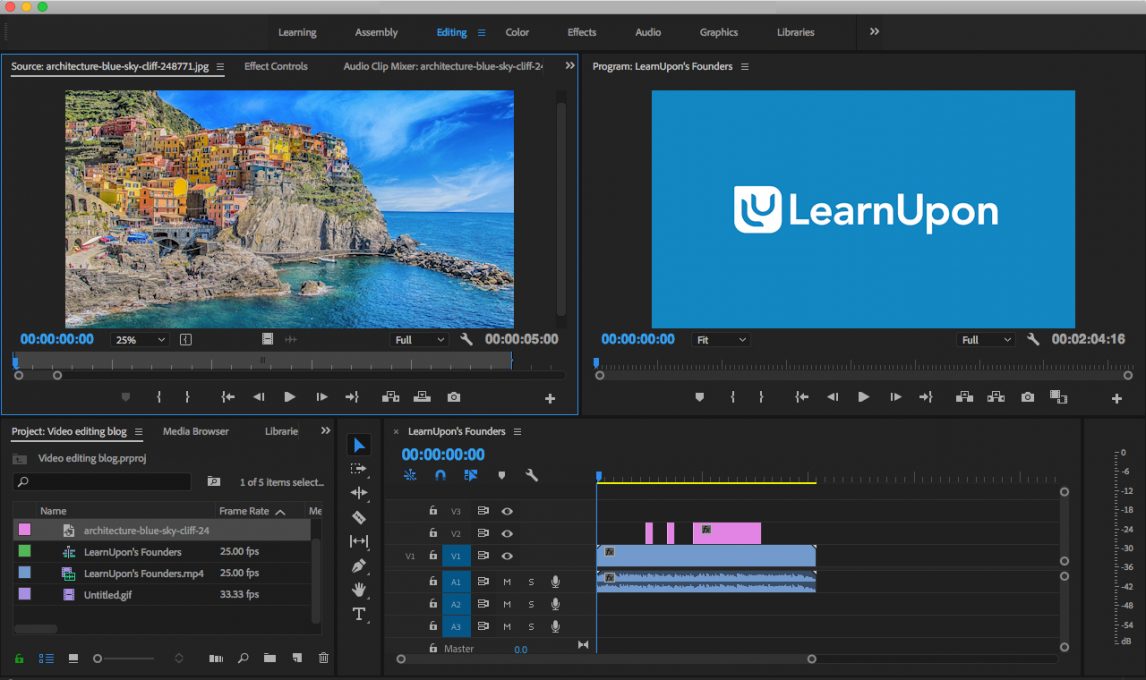
- Add these pieces of media (scenes) to the workspace.
- Chop up your scenes with the razor/scissors tool. This allows you to remove excess footage in each scene and tighten up the overall video.
- Arrange the trimmed down scenes into a sequence/order.
- Add details such as overlays, lower thirds, and music.
Here’s an excellent breakdown of a common editing workflow for in Premiere Pro.
Transitioning between clips
Placing one clip after another in a Timeline panel results in a cut. The last frame of the first clip is followed by the first frame of the second. Jumping from one clip to the next without a transition will make your video appear amateurish, and even distracting. It’s important to knit ‘scenes’ together in a way that isn’t distracting for the viewer. So what are your options? Jumping directly from one scene to another can be jarring. This method is very popular with YouTube vloggers who want to push the pace, keeping their audience on their toes. There are countless options for transitioning between scenes.
Once you become aware of them you can’t really unsee them. The star wars wipe transitions are iconic, but not necessarily suitable for your compliance training videos! For eLearning, we suggest being a little more conservative and using some other methods. Here are two simple transitions that add a little bit of flair to your videos, but are not going to distract the viewer if they’re done well. Cross dissolve – The first scene fades to black, and then the second scene fades in. This gives the effect of a gradual transition from one image to another. It’s a great transition to use as it is almost like a reset for the learner. They are giving a clear visual cue that the focus has changed. Here’s how to achieve this in Premiere Pro. Split edit – This comes in two forms: the L Cut and the J cut. It’s a great way to help transition the viewer to the next scene. In an L cut, the audio from the first scene carries over to the next, making the changeover seamless. A J cut is the opposite. The audio from the next scene invades the current one. This signals to the viewer that a change is coming. This video is a great explanation of how to achieve a split edit in Premiere Pro.
Adding some detail
Once the structure is in place and you’re happy with how everything flows it’s time to finish up. These last little details are easy to achieve and add a layer of professionalism.
Lower thirds
If you need to help the audience identify who the person on screen is, use lower thirds. The term may not be familiar but you already know what a lower third is. Think of a news anchor. A graphic is placed on screen with their name, title, and the broadcasters logo. They are placed in the title safe area – the area of the screen that is “not in the way” of the viewer’s gaze.  Tip: If you are placing text on screen it should be legible. One way to ensure this is to place it on contrasting backgrounds. So if the background is black, use white text. And if it’s white, use a dark color for the text.
Pan/Zoom on images
If you have static images that you want to add to your video you have two great options that will ensure they look the part. These options are pan and zoom. Panning and zooming over an image is often called the Ken Burns effect. This serves to “trick” the viewer into thinking the image isn’t static, making these sections much more visually appealing.
Audio
Adding some background audio helps to reduce the sense of isolation. However, you should only do this when appropriate. Any music added should suit the tone of the video, so it doesn’t distract the viewer from the video itself. Try using music that is cyclical in nature. And avoid tracks that are constantly changing or leading to large crescendos! Make sure to reduce the volume of any background music relative to any vocal tracks. The background music should be loud enough to hear, but not loud enough to overpower! Tip: This one comes from experience. Set yourself a deadline when adding embellishments. Editing is a task that can be perpetual, a constant tinkering of elements. Reduce the likelihood of falling into a perpetual editing phase by setting a deadline.
Exporting your video
When you’re happy with your video, it’s time to export. This is a step in the process that causes the most amount of problems for people. A lot of the terminology and phrases are quite technical in nature. Here’s the basic workflow to export a video for Premiere Pro and Camtasia.
Exporting in Premiere Pro
- To export a sequence as an H.264 file (the most popular option), make sure the Timeline panel is active and choose File > Export > Media or press Control+M (Windows) or Command+M (Mac OS).
- Choose a format: H.264 is the best to go with for most use cases and choose the preset: Match Source – High Bitrate.
- To choose a filename and location to save (desktop etc.)
- Save as mp4
Export in Camtasia
Camtasia’s export process is very simple.
- Click the Share button
- Choose Local file
- Save as mp4 to a file destination of your choice (desktop etc.)
Hopefully, this is a good explainer for you to begin editing your eLearning videos. By cutting away excess material and taking some basic steps to tie your video content together, your courses will be more engaging for your audience. Let me know if you have any questions in the comments section.